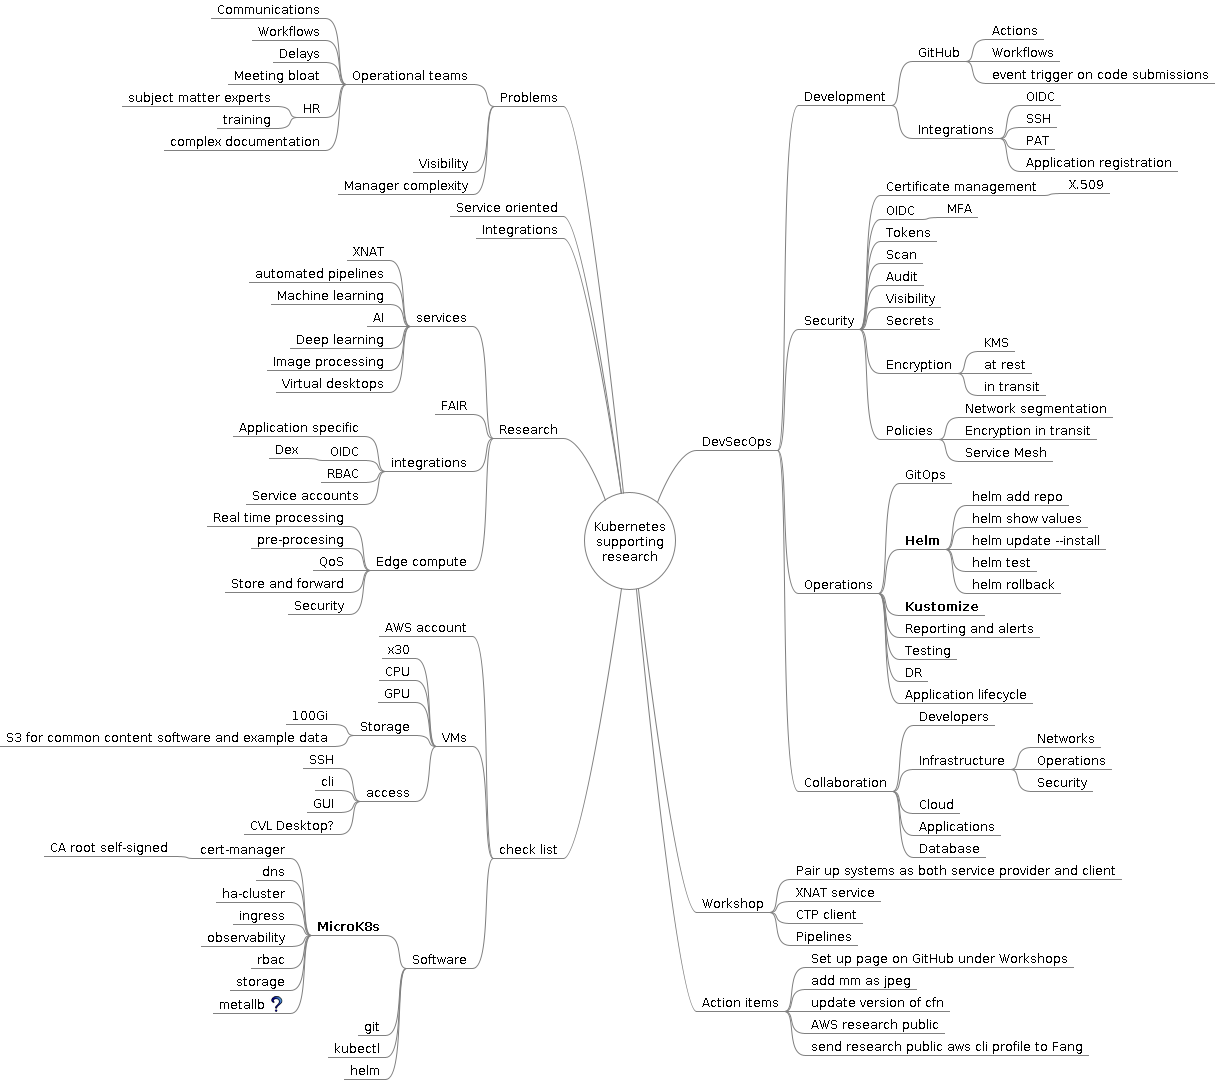
eResearch Australasia 2023 Conference
Introduction
Terms and concepts from our perspective
- Kubernetes
- Cloud
- Simple - really meaning
managed complexity
Very brief Kubernetes at high level
- Kubernetes Components
- Control plane
- API server
- etcd
- Node components
- kubelet - makes sure that containers are running in a Pod
- kube-proxy - network proxy that runs on each node
- Container runtime - run containers
- CRI - Container Runtime Interface
- e.g., containerd
- Control plane
Minimum host machine specs
- Recommendation: use the VM provided by the instructor. This will help to ensure the machine has been tested to work with the content.
| min. spec | |
|---|---|
| RAM | 8 Gi |
| vCPU | 2 |
| HDD | 100 GB |
Notes for instructors
- Print out the details bellow and distribute to attendees to speed up setup
- Machine DNS or IP address for connection
- Password set up for workshop
- Quick Start guide outlining how to connect and access the GUI. Both Windows and Mac clients should be included as a minimum.
- Verify cloud resource is available to support ec2 instance numbers
aws service-quotas get-service-quota --service-code ec2 --quota-code L-3819A6DF- NB: Measured in vCPUs - g4dn.xlarge - 4x vCPU ea - 4x 24 participants = 96 vCPUs
- Verify access to VM using password from the workshop location to ensure unhindered access
Design highlights
Getting started
Your instructor will provide the following
- AWS EC2 instance
- DNS address to host
- Initial password to the default
ubuntuuser account
ssh -Llocalhost:63389:localhost:3389 ubuntu@MACHINE_NAME.ap-southeast-2.compute.amazonaws.com

tmux
# Install Kubernetes
sudo snap install microk8s --classic
sudo usermod -a -G microk8s ubuntu

# Add client tools
sudo snap install kubectl --classic
echo 'source <(kubectl completion bash)' >>~/.bashrc

sudo snap install helm --classic
echo 'source <(helm completion bash)' >>~/.bashrc

mkdir -p $HOME/.local/bin
mkdir -p $HOME/.kube

# calicoctl
curl -L https://github.com/projectcalico/calico/releases/download/v3.25.0/calicoctl-linux-amd64 -o $HOME/.local/bin/calicoctl
chmod +x $HOME/.local/bin/calicoctl

# Log out and back in
# This will load all the environment changes into your new active shell.

# Setup kubectl with microk8s cluster configuration
(umask 0077; microk8s config > $HOME/.kube/config)

# Whats happened
microk8s status
kubectl get nodes
kubectl get pod --all-namespaces

# Notice Calico virutal network interfaces
ip addr

# View default Calico IP pod address allocation pool
calicoctl get ippool
Getting to know your Kubernetes cluster
kubectl version
kubectl cluster-info dump |less
kubectl api-resources
Internal DNS
# The default namespace 'default' is used if namespace is not specified
kubectl run testmachine --image=ubuntu:latest -- tail -f /dev/null
kubectl get pod
kubectl exec -it testmachine -- bash
# In the container shell
# Internal cluster DNS configuration
cat /etc/resolv.conf

# Kubernetes as a process watchdog (systemd) NB: PID 1
ps aux

apt update
apt -y install dnsutils
dig google.com.au
Covered
- Microk8s basics
- Kubernetes cluster overview
- Internal DNS and service naming convention
- Getting adhoc development and testing pods
Kubernetes add-ons
Role Based Access Control (RBAC)
microk8s enable rbac
kubectl api-resources
Observability
microk8s enable observability

kubectl --namespace observability get pods -l "release=kube-prom-stack"

kubectl port-forward service/kube-prom-stack-grafana 8080:80

# Using the browser
# Address: http://localhost:8080
# Username: admin
# Password: prom-operator
Persistence, Storage classes, Volumes
microk8s enable hostpath-storage
kubectl get sc

cat <<EOT |kubectl create -f -
apiVersion: v1
kind: PersistentVolumeClaim
metadata:
  name: my-first-pvc
spec:
  accessModes:
    - ReadWriteOnce
  resources:
    requests:
      storage: 5Gi
  volumeMode: Filesystem
  storageClassName: microk8s-hostpath
EOT

kubectl get pvc
kubectl descibe pvc my-first-pvc
Create a PVC consumer
cat <<EOT |kubectl apply -f -
apiVersion: v1
kind: Pod
metadata:
  name: my-first-pod
  labels:
    app.kubernetes.io/name: my-first-pod
spec:
  containers:
    - name: basic-web
      image: nginx
      ports:
        - containerPort: 80
          name: http-web-svc
      volumeMounts:
        - mountPath: /var/www/html
          name: my-first-pvc
  volumes:
    - name: my-first-pvc
      persistentVolumeClaim:
        claimName: my-first-pvc
EOT

watch kubectl get pod
kubectl describe pod my-first-pod
kubectl logs my-first-pod

kubectl get pvc,pv
NB extra details for later:
- Label and selectors
- container ports
Services, Ingress and Load balancers
microk8s enable ingress
kubectl get pod --all-namespaces
kubectl api-resources
kubectl get ingressclasses

curl localhost:80
Add a HTTP service to ‘my-first-pod’
cat <<EOT |kubectl apply -f -
apiVersion: v1
kind: Service
metadata:
  name: my-first-service
spec:
  selector:
    app.kubernetes.io/name: my-first-pod
  ports:
    - protocol: TCP
      port: 80
      targetPort: 80
EOT

kubectl port-forward service/my-first-service 8080:80

# Open another terminal
curl localhost:8080
Add an Ingress to ‘my-first-pod’
cat <<EOT |kubectl apply -f -
apiVersion: networking.k8s.io/v1
kind: Ingress
metadata:
  name: my-first-ingress
spec:
  ingressClassName: nginx
  rules:
  - host: "mywebservice.local"
    http:
      paths:
      - path: /
        pathType: Prefix
        backend:
          service:
            name: my-first-service
            port:
              number: 80
EOT

kubectl get ing
curl --resolve mywebservice.local:80:127.0.0.1 http://mywebservice.local
Deploy applications using Helm
Install AIS XNAT
# Add the AIS helm repository
helm repo add ais https://australian-imaging-service.github.io/charts

helm repo update
helm search repo ais/

# Review and create local values.yaml for deployment
helm show values ais/xnat |less

HOST=$(hostname --fqdn)
XNATDCMNodePort=30002

cat <<EOT >xnat-values.yaml
global:
  storageClass: microk8s-hostpath

postgresql:
  enabled: true

xnat-web:
  image:
    repository:  ghcr.io/australian-imaging-service/xnat
    tag: v1.8.9.1
    pullPolicy: IfNotPresent
  resources:
    requests:
      cpu: 1000m
      memory: 8000Mi
    limits:
      cpu: 4000m
      memory: 8000Mi
  nonheapmem: 4000Mi
  dicom_scp:
    recievers:
      - ae_title: "XNAT"
        port: 8104
        nodePort: $XNATDCMNodePort
  ingress:
    enabled: true
    annotations:
      nginx.ingress.kubernetes.io/proxy-connect-timeout: "150"
      nginx.ingress.kubernetes.io/proxy-send-timeout: "100"
      nginx.ingress.kubernetes.io/proxy-read-timeout: "100"
      nginx.ingress.kubernetes.io/proxy-buffers-number: "4"
      nginx.ingress.kubernetes.io/proxy-buffer-size: "32k"
    hosts:
      - host: $HOST
  plugins:
    ohif-viewer: {}
  probes:
    startup:
      failureThreshold: 15
      periodSeconds: 60
    liveness:
      failureThreshold: 12
      periodSeconds: 10
      timeoutSeconds: 5
    readiness:
      failureThreshold: 1
      periodSeconds: 10
      timeoutSeconds: 3
  replicaCount: 1
EOT

helm upgrade xnat ais/xnat -n xnat -i --create-namespace -f xnat-values.yaml

# Watch pods and ingres creation
watch -n 1 -d kubectl get pods,ing -n xnat
Testig XNAT
For Mac users, need to install Microsoft Remote Desktop from Apple App store
Add a new PC in Microsoft Remote Desktop
 PC Name: localhost:63389
 User account: ubuntu
Connect to your VM
Run Firefox and access http://dummy-xnat-domain-name
Log in as user 'admin' with password 'admin'
X.509 certificate management
microk8s enable cert-manager

cat <<EOT |kubectl apply -f -
apiVersion: cert-manager.io/v1
kind: ClusterIssuer
metadata:
  name: selfsign
spec:
  selfSigned: {}
EOT
Mapping it out